ElasticSearch
Installation
Steps pretty much same as available on internet different website, but mistake was found in elasticsearch.service file where it was unable to start elasticsearch service on the ubuntu server, below is the elasticsearch.service file
New one
elasticsearch.service
[Unit]
Description=Elasticsearch
Documentation=https://www.elastic.co/guide/en/elasticsearch/reference/current/index.html
Wants=network-online.target
After=network-online.target
[Service]
Type=simple
User=elasticsearch
Group=elasticsearch
ExecStart=/usr/share/elasticsearch/bin/elasticsearch
Restart=on-failure
RestartSec=5s
StartLimitInterval=0
[Install]
WantedBy=multi-user.target
Old one
[Unit]
Description=Elasticsearch
Documentation=https://www.elastic.co/guide/en/elasticsearch/reference/current/index.html
Wants=network-online.target
After=network-online.target
[Service]
Type=simple
User=your_username
Group=your_username
ExecStart=/home/your_username/elasticsearch-7.15.0/bin/elasticsearch
Restart=on-failure
RestartSec=5s
StartLimitInterval=0
[Install]
WantedBy=multi-user.target
Step 1: Install Java
Ensure that Java Development Kit (JDK) is installed on your server. ELK stack requires Java to run.
You can check if Java is already installed by running the command: java -version.
If Java is not installed or an older version is present, install JDK by following the appropriate instructions for your server's operating system.
Step 2: Install Elasticsearch
Add the Elasticsearch repository key:
wget -qO - https://artifacts.elastic.co/GPG-KEY-elasticsearch | sudo apt-key add -
Add the Elasticsearch repository:
echo "deb https://artifacts.elastic.co/packages/7.x/apt stable main" | sudo tee /etc/apt/sources.list.d/elastic-7.x.list
Update the package lists and install Elasticsearch:
sudo apt update
sudo apt install elasticsearch
Start Elasticsearch service and enable it to start on boot:
sudo systemctl start elasticsearch
sudo systemctl enable elasticsearch
Confirm Elasticsearch is running by accessing its status:
sudo systemctl status elasticsearch
Step 3: Install Logstash
Add the Logstash repository key and repository:
wget -qO - https://artifacts.elastic.co/GPG-KEY-elasticsearch | sudo apt-key add -
echo "deb https://artifacts.elastic.co/packages/7.x/apt stable main" | sudo tee /etc/apt/sources.list.d/elastic-7.x.list
Update the package lists and install Logstash:
sudo apt update
sudo apt install logstash
Step 4: Install Kibana
Add the Kibana repository key and repository:
wget -qO - https://artifacts.elastic.co/GPG-KEY-elasticsearch | sudo apt-key add -
echo "deb https://artifacts.elastic.co/packages/7.x/apt stable main" | sudo tee /etc/apt/sources.list.d/elastic-7.x.list
Update the package lists and install Kibana:
sudo apt update
sudo apt install kibana
Step 5: Install MySQL Connector for Logstash
Install the MySQL Connector for Logstash:
sudo /usr/share/logstash/bin/logstash-plugin install logstash-integration-jdbc
Step 6: Configure Logstash
Create a Logstash configuration file, for example, car-details.conf
sudo nano /etc/logstash/conf.d/car-details.conf
Add the following configuration to the file:
input {
jdbc {
jdbc_driver_library => "/path/to/mysql-connector-java.jar"
jdbc_driver_class => "com.mysql.jdbc.Driver"
jdbc_connection_string => "jdbc:mysql://localhost:3306/your_database_name"
jdbc_user => "your_mysql_username"
jdbc_password => "your_mysql_password"
statement => "SELECT * FROM car_details"
}
}
output {
elasticsearch {
hosts => ["localhost:9200"]
index => "car_details_index"
}
}
Replace /path/to/mysql-connector-java.jar with the actual path to the MySQL Connector JAR file.
Modify the jdbc_connection_string, jdbc_user, and jdbc_password to match your MySQL database configuration.
Adjust the statement to your specific SQL query for retrieving car details from the car_details table.
Save the file and exit the text editor.
Step 7: Configure Elasticsearch and Kibana
Open the Elasticsearch configuration file using a text editor:
sudo nano /etc/elasticsearch/elasticsearch.yml
Uncomment the line containing #network.host and replace it with:
network.host: localhost
Save the file and exit the text editor.
Open the Kibana configuration file using a text editor:
sudo nano /etc/kibana/kibana.yml
Uncomment the line containing #server.host and replace it with:
server.host: "localhost"
Save the file and exit the text editor.
Step 8: Start and Enable Services
Start Logstash service and enable it to start on boot:
sudo systemctl start logstash
sudo systemctl enable logstash
Start Kibana service and enable it to start on boot:
sudo systemctl start kibana
sudo systemctl enable kibana
Import data from mysql to elasticsearch
—-----------------------------------------------------------------------------------
Create your file on below location like below:
vi /etc/logstash/conf.d/car-details.conf
input {
jdbc {
jdbc_connection_string => "jdbc:mysql://localhost:3306/test_au2.database"
jdbc_user => "test_au2.database"
jdbc_password => "t1_0Ng27i"
jdbc_driver_library => "/usr/share/java/mysql-connector-java-8.0.27/mysql-connector-java-8.0.27.jar"
jdbc_driver_class => "com.mysql.cj.jdbc.Driver"
statement => "SELECT * FROM tbl_country"
}
}
output {
elasticsearch {
hosts => ["localhost:9200"]
index => "tbl_country_car_details"
document_id => "%{id}"
}
}
—--------------------------------------------------------------------------------------
In above file we taking one table tbl_country after connection with mysql whatever data we have in this table we importing in elastic search.
How to run above config file and importing data - belos is the cmd
sudo /usr/share/logstash/bin/logstash -f /etc/logstash/conf.d/car-details.conf
Issue during python script execution
Issue : elasticsearch was installed and running then also we were getting an error : can not import elasticsearch.
[root@master-node ~]# python3 --version
Python 3.6.8
[root@master-node ~]# pip3 --version
pip 21.3.1 from /usr/local/lib/python3.6/site-packages/pip (python 3.6)
[root@master-node ~]#
[root@master-node ~]# pip3 show elasticsearch
Name: elasticsearch
Version: 8.8.2
Summary: Python client for Elasticsearch
Home-page: https://github.com/elastic/elasticsearch-py
Author: Honza Král, Nick Lang
Author-email: honza.kral@gmail.com, nick@nicklang.com
License: Apache-2.0
Location: /usr/local/lib/python3.6/site-packages
Requires: elastic-transport
Required-by:
Note: - Make soure pip –version location should match with when you checking elasticsearch package by pip show cmd
Also check if there is any cache and other elasticsearch.py creating conflict that you can delete like
__pycache__ and elasticsearch.py
How to do full-text search in Elasticsearch ?
To achieve full-text search in Elasticsearch, you need to follow these steps:
Install Elasticsearch: Start by installing Elasticsearch on your system or setting it up in a distributed cluster if you have a larger deployment.
Create an Index: Define an index in Elasticsearch to store your documents. An index is a logical namespace that holds a collection of documents. You can specify settings for the index, such as the number of shards and replicas, and define mappings to specify how the fields in your documents should be indexed and analyzed.
Ingest Documents: Index your documents into Elasticsearch by sending JSON payloads to the appropriate API endpoint. Elasticsearch will automatically parse and index the documents based on the specified mappings.
Perform Full-Text Searches: Utilize the search API provided by Elasticsearch to execute full-text searches on your indexed documents. You can construct queries using Elasticsearch's Query DSL, which supports a wide range of search options and features. You can search for specific terms, use fuzzy matching, perform phrase searches, apply filters, and more.
So step 1 is done,
Step 2: Create an Index:
Open kibana console - Open Dev tool

Field in tmp_tbl_cars in mysql that we would like to index or want to creat index
cartitlename
sellerttype
carmake
carmodel
kilometers
price
registrationmonth
registrationyears
power
emissionclass
carcondition
type
engine_type
color
latitude
longitude
city
postcode
transmission
makeyear
carfeatures
co2
Consumption
To create an index in Elasticsearch for the fields you mentioned from the tmp_tbl_cars table, Open Kibana in your web browser and log in.
Go to the Kibana home page.
Click on the "Dev Tools" tab in the top navigation bar.
In the Kibana Dev Tools console, you can use the following command to create an index with the desired fields, in how case we taking above fields:
Query for creating index:
—------------------------------------------------------------------------------------
PUT tmp_car_detail
{
"mappings": {
"properties": {
"cartitlename": {
"type": "text"
},
"sellerttype": {
"type": "integer"
},
"carmake": {
"type": "keyword"
},
"carmodel": {
"type": "keyword"
},
"kilometers": {
"type": "integer"
},
"price": {
"type": "integer"
},
"registrationmonth": {
"type": "integer"
},
"registrationyears": {
"type": "integer"
},
"power": {
"type": "integer"
},
"emissionclass": {
"type": "keyword"
},
"carcondition": {
"type": "keyword"
},
"type": {
"type": "keyword"
},
"engine_type": {
"type": "keyword"
},
"color": {
"type": "keyword"
},
"latitude": {
"type": "double"
},
"longitude": {
"type": "double"
},
"city": {
"type": "keyword"
},
"postcode": {
"type": "keyword"
},
"transmission": {
"type": "keyword"
},
"makeyear": {
"type": "keyword"
},
"carfeatures": {
"type": "text"
},
"co2": {
"type": "text"
},
"Consumption": {
"type": "text"
}
}
}
}
—---------------------------------------------------------
After creating the index in Elasticsearch, you can view the index and its data in Kibana. Here's how you can do it:
Go to the Kibana home page.
Click on the "Discover" tab in the top navigation bar.
If you haven't created an index pattern yet, you will be prompted to create one. Click on "Create index pattern".
In the "Index pattern" field, enter the name of your index (tmp_car_detail in this case).
Follow the prompts and configure any advanced settings if needed.
Once the index pattern is created, you will be redirected to the Discover page.
In the "Available Fields" section on the left, you will see all the fields present in your index.
You can click on the field names to view the data in each field and perform searches and filters on the data.
Use the search bar and filter options to query and explore the data in your index.
Note in our case we just created index, so did not upload document in the index, for that we can use a python script that will help in uploading data from mysql field to elasticsearch indexes.
—---------------------------------------------------------------------------------------------------------------------------------------
Script path:
/root/elasticsearch_indexing_development/index_to_elastic/indexing_to_elastic_with_limit.py
from elasticsearch import Elasticsearch
import pymysql
# Connect to MySQL
mysql_conn = pymysql.connect(
host="localhost",
user="test_au2.database",
password="t1_0Ng27i",
database="test_au2.database"
)
# Connect to Elasticsearch
es = Elasticsearch([{'host': 'localhost', 'port': 9200, 'scheme': 'http'}])
# Retrieve data from MySQL
cursor = mysql_conn.cursor()
cursor.execute("SELECT cartitlename, sellerttype, carmake, carmodel, kilometers, price, registrationmonth, registrationyears, power, emissionclass, carcondition, type, engine_type, color, latitude, longitude, city, postcode, transmission, makeyear, carfeatures, co2, Consumption FROM tmp_tbl_cars")
rows = cursor.fetchall()
# Limit the number of records to index
limit = 5000
counter = 0
# Iterate and index data in Elasticsearch
for row in rows:
data = {
"cartitlename": row[0],
"sellerttype": row[1],
"carmake": row[2],
"carmodel": row[3],
"kilometers": row[4],
"price": row[5],
"registrationmonth": row[6],
"registrationyears": row[7],
"power": row[8],
"emissionclass": row[9],
"carcondition": row[10],
"type": row[11],
"engine_type": row[12],
"color": row[13],
"latitude": row[14],
"longitude": row[15],
"city": row[16],
"postcode": row[17],
"transmission": row[18],
"makeyear": row[19],
"carfeatures": row[20],
"co2": row[21],
"Consumption": row[22]
}
# Index the data in Elasticsearch
es.index(index="tmp_car_detail", body=data)
# Increment the counter
counter += 1
# Check if the limit has been reached
if counter >= limit:
break
# Close connections
cursor.close()
mysql_conn.close()
—----------------------------------------------------------------------
Run above script it will upload 5000 document in your index tmp_car_detail

Once it upload 5000 document you can see in your kibana Discover page

Now you are ready for full-text search
Open Dev Tool again -

And run your full text search query: query can be anything, just beside tab you will its response
Here are 10-15 full-text search queries you can try with the given data:
Search for cars with the make "Dacia":
GET tmp_car_detail/_search
{
"query": {
"match": {
"carmake": "Dacia"
}
}
}

Search for cars with the model "dacia jogger":
GET tmp_car_detail/_search
{
"query": {
"match": {
"carmodel": "dacia jogger"
}
}
}

Search for cars in Gummersbach city:
GET tmp_car_detail/_search
{
"query": {
"match": {
"city": "Gummersbach"
}
}
}

Search for cars with a price greater than 20,000:
GET tmp_car_detail/_search
{
"query": {
"range": {
"price": {
"gt": 20000
}
}
}
}

Search for cars with a transmission type of "Manual gearbox":
GET tmp_car_detail/_search
{
"query": {
"match": {
"transmission": "Manual gearbox"
}
}
}

Search for cars with a specific color, e.g., "grün":
GET tmp_car_detail/_search
{
"query": {
"match": {
"color": "grün"
}
}
}
Search for cars with a specific engine type, e.g., "Benzin":
GET tmp_car_detail/_search
{
"query": {
"match": {
"engine_type": "Benzin"
}
}
}
Search for cars with a specific CO2 emission value, e.g., 130:
GET tmp_car_detail/_search
{
"query": {
"match": {
"co2": "130"
}
}
}
Search for cars with a specific power value, e.g., 110:
GET tmp_car_detail/_search
{
"query": {
"match": {
"power": "110"
}
}
}
Search for cars with a specific kilometer value, e.g., 10:
GET tmp_car_detail/_search
{
"query": {
"match": {
"kilometers": "10"
}
}
}
Remember to adjust the index name (tmp_car_detail) according to your Elasticsearch setup. Also, note that the queries assume the fields are of type text or keyword. If the fields have a different type, you may need to modify the queries accordingly.
How do we enable multilanguage support?
we enable multilanguage support in your "tmp_car_detail" index, you can modify the existing mapping to include language-specific fields and analyzers. Here's an example of how you can enable multilanguage support for the "cartitlename" field:
—---------------------------------------------------------------------------------------------
PUT tmp_car_detail/_mapping
{
"properties": {
"cartitlename": {
"type": "text",
"fields": {
"english": {
"type": "text",
"analyzer": "english"
},
"french": {
"type": "text",
"analyzer": "french"
},
"german": {
"type": "text",
"analyzer": "german"
}
// Add more language-specific analyzers as needed
}
}
}
}

—---------------------------------------------------------------------------------
How to see above multilanguage support enabled ?
GET tmp_car_detail/_search
{
"query": {
"match": {
"cartitlename.english": "car"
}
}
}

Check in German.
GET tmp_car_detail/_search
{
"query": {
"match": {
"cartitlename.german": "Auto"
}
}
}

Note: - Above all index and document under index are with multi language (currently only applied one field cartitlename) and without multi language support, but for adding geo_point for latitude/ longitude under one field, we need to drop index and its data(document) and we will recreate it as below:
Mapping:
Start by defining the mapping for your index, specifying a field as a geo_point type to store the geolocation information. Here's an example of how you can create a mapping:
—----------------------------------------------------------------------------------------------------------------------------
PUT tmp_car_detail
{
"mappings": {
"properties": {
"cartitlename": {
"type": "text",
"fields": {
"english": {
"type": "text",
"analyzer": "english"
},
"french": {
"type": "text",
"analyzer": "french"
},
"german": {
"type": "text",
"analyzer": "german"
}
// Add more language-specific analyzers as needed
}
},
"sellerttype": {
"type": "integer"
},
"carmake": {
"type": "keyword"
},
"carmodel": {
"type": "keyword"
},
"kilometers": {
"type": "integer"
},
"price": {
"type": "integer"
},
"registrationmonth": {
"type": "integer"
},
"registrationyears": {
"type": "integer"
},
"power": {
"type": "integer"
},
"emissionclass": {
"type": "keyword"
},
"carcondition": {
"type": "keyword"
},
"type": {
"type": "keyword"
},
"engine_type": {
"type": "keyword"
},
"color": {
"type": "keyword"
},
"location": {
"type": "geo_point"
},
"city": {
"type": "keyword"
},
"postcode": {
"type": "keyword"
},
"transmission": {
"type": "keyword"
},
"makeyear": {
"type": "keyword"
},
"carfeatures": {
"type": "text"
},
"co2": {
"type": "text"
},
"Consumption": {
"type": "text"
}
}
}
}
—-----------------------------------------------------------------------------------------------------------------------------
Indexing Documents:
When you index your documents, make sure to include the latitude and longitude values in the location field. Here how you upload document via python script.
—--------------------------------------------------------------------------------------------------------------------------
from elasticsearch import Elasticsearch
import pymysql
# Connect to MySQL
mysql_conn = pymysql.connect(
host="localhost",
user="test_au2.database",
password="t1_0Ng27i",
database="test_au2.database"
)
# Connect to Elasticsearch
es = Elasticsearch([{'host': 'localhost', 'port': 9200, 'scheme': 'http'}])
# Retrieve data from MySQL
cursor = mysql_conn.cursor()
cursor.execute("SELECT cartitlename, sellerttype, carmake, carmodel, kilometers, price, registrationmonth, registrationyears, power, emissionclass, carcondition, type, engine_type, color, latitude, longitude, city, postcode, transmission, makeyear, carfeatures, co2, Consumption FROM tmp_tbl_cars")
rows = cursor.fetchall()
# Limit the number of records to index
limit = 5000
counter = 0
# Iterate and index data in Elasticsearch
for row in rows:
data = {
"cartitlename": row[0],
"sellerttype": row[1],
"carmake": row[2],
"carmodel": row[3],
"kilometers": row[4],
"price": row[5],
"registrationmonth": row[6],
"registrationyears": row[7],
"power": row[8],
"emissionclass": row[9],
"carcondition": row[10],
"type": row[11],
"engine_type": row[12],
"color": row[13],
"location": {
"lat": row[14],
"lon": row[15]
},
"city": row[16],
"postcode": row[17],
"transmission": row[18],
"makeyear": row[19],
"carfeatures": row[20],
"co2": row[21],
"Consumption": row[22]
}
# Index the data in Elasticsearch
es.index(index="tmp_car_detail", body=data)
# Increment the counter
counter += 1
# Check if the limit has been reached
if counter >= limit:
break
# Close connections
cursor.close()
mysql_conn.close()
—---------------------------------------------------------------------------------------------------------------------------
Performing Geolocation Queries:
To find cars with the name "DACIA Jogger" and their locations in the city of "Gummersbach", you can use the following query:
—----------------------------------------------------------------------------------------------------------------------------
GET tmp_car_detail/_search
{
"query": {
"bool": {
"must": [
{
"match": {
"city": "Gummersbach"
}
},
{
"match": {
"cartitlename": "DACIA Jogger"
}
}
]
}
},
"_source": ["cartitlename", "location"]
}

—---------------------------------------------------------------------------------------------------------------------------
Tokenization in Elasticsearch.
Tokenization is the process of breaking a text string into individual words or tokens, often removing punctuation and applying lowercasing. This process is essential for indexing and searching textual data efficiently. Elasticsearch uses tokenization during the indexing phase to split text into tokens and create an inverted index, which allows for efficient full-text search capabilities.
By default, Elasticsearch applies a standard tokenizer to text fields, which splits the text into tokens based on whitespace, punctuation, and other language-specific rules. However, you can customize tokenization by using different analyzers, tokenizers, and token filters. Analyzers define the entire process of text analysis, including tokenization, while tokenizers and token filters are components within an analyzer.
By understanding the tokenization process, you can configure Elasticsearch to handle various search scenarios, such as case-insensitive searches, stemming, synonyms, and more.
Mapping
Drop previous index and create again / Mapping:
—----------------------------------------------------------------------------------------------------------------
PUT tmp_car_detail
{
"settings": {
"analysis": {
"analyzer": {
"custom_analyzer": {
"tokenizer": "standard",
"filter": [
"lowercase",
"my_stemmer",
"my_synonyms"
]
},
"english_analyzer": {
"tokenizer": "standard",
"filter": [
"lowercase",
"english_stemmer"
]
},
"german_analyzer": {
"tokenizer": "standard",
"filter": [
"lowercase",
"german_stemmer"
]
},
"french_analyzer": {
"tokenizer": "standard",
"filter": [
"lowercase",
"french_stemmer"
]
}
},
"filter": {
"my_stemmer": {
"type": "stemmer",
"name": "english"
},
"my_synonyms": {
"type": "synonym",
"synonyms": [
"automatic, auto",
"condition, state",
"make1, brand1",
"make2, brand2"
]
},
"english_stemmer": {
"type": "stemmer",
"name": "english"
},
"german_stemmer": {
"type": "stemmer",
"name": "light_german"
},
"french_stemmer": {
"type": "stemmer",
"name": "light_french"
}
}
}
},
"mappings": {
"properties": {
"cartitlename": {
"type": "text",
"analyzer": "custom_analyzer"
},
"sellerttype": {
"type": "keyword"
},
"carmake": {
"type": "text",
"analyzer": "custom_analyzer"
},
"carmodel": {
"type": "text",
"analyzer": "custom_analyzer"
},
"kilometers": {
"type": "integer"
},
"price": {
"type": "integer"
},
"registrationmonth": {
"type": "integer"
},
"registrationyears": {
"type": "integer"
},
"power": {
"type": "integer"
},
"emissionclass": {
"type": "text",
"analyzer": "custom_analyzer"
},
"carcondition": {
"type": "text",
"analyzer": "custom_analyzer"
},
"type": {
"type": "text",
"analyzer": "custom_analyzer"
},
"engine_type": {
"type": "text",
"analyzer": "custom_analyzer"
},
"color": {
"type": "text",
"analyzer": "custom_analyzer"
},
"latitude": {
"type": "float"
},
"longitude": {
"type": "float"
},
"city": {
"type": "text",
"analyzer": "custom_analyzer"
},
"postcode": {
"type": "keyword"
},
"transmission": {
"type": "text",
"analyzer": "custom_analyzer"
},
"makeyear": {
"type": "keyword"
},
"carfeatures": {
"type": "text",
"analyzer": "custom_analyzer"
},
"co2": {
"type": "text",
"analyzer": "custom_analyzer"
},
"Consumption": {
"type": "text",
"analyzer": "custom_analyzer"
},
"location": {
"type": "geo_point"
}
}
}
}
—----------------------------------------------------------------------------------------------------------------
Indexing Documents:
—-----------------------------------------------------------------------------------------------------
from elasticsearch import Elasticsearch
import pymysql
# Connect to MySQL
mysql_conn = pymysql.connect(
host="localhost",
user="test_au2.database",
password="t1_0Ng27i",
database="test_au2.database"
)
# Connect to Elasticsearch
es = Elasticsearch([{'host': 'localhost', 'port': 9200, 'scheme': 'http'}])
# Retrieve data from MySQL
cursor = mysql_conn.cursor()
cursor.execute("SELECT cartitlename, sellerttype, carmake, carmodel, kilometers, price, registrationmonth, registrationyears, power, emissionclass, carcondition, type, engine_type, color, latitude, longitude, city, postcode, transmission, makeyear, carfeatures, co2, Consumption FROM tmp_tbl_cars")
rows = cursor.fetchall()
# Limit the number of records to index
limit = 5000
counter = 0
# Iterate and index data in Elasticsearch
for row in rows:
data = {
"cartitlename": row[0],
"sellerttype": row[1],
"carmake": row[2],
"carmodel": row[3],
"kilometers": row[4],
"price": row[5],
"registrationmonth": row[6],
"registrationyears": row[7],
"power": row[8],
"emissionclass": row[9],
"carcondition": row[10],
"type": row[11],
"engine_type": row[12],
"color": row[13],
"location": {
"lat": row[14],
"lon": row[15]
},
"city": row[16],
"postcode": row[17],
"transmission": row[18],
"makeyear": row[19],
"carfeatures": row[20],
"co2": row[21],
"Consumption": row[22]
}
# Index the data in Elasticsearch
es.index(index="tmp_car_detail", body=data)
# Increment the counter
counter += 1
# Check if the limit has been reached
if counter >= limit:
break
# Close connections
cursor.close()
mysql_conn.close()
—---------------------------------------------------------------------------------------------------------
Query String Query.
GET tmp_car_detail/_search
{
"query": {
"query_string": {
"query": "i want all cars in city Gummersbach with manual gearbox",
"default_field": "*"
}
}
}

Response:
Got 3 response for query
The query type used in the provided example is the Query String Query.
In the query, the "query_string" key indicates the use of the Query String Query. This query allows you to construct queries using a query string syntax, where you can define complex search expressions with operators and modifiers.
The "query" field specifies the actual query string: "i want all cars in city Gummersbach with manual gearbox". This query string expresses the desired search criteria.
The "default_field" field specifies the default field to search within when no specific field is specified. In this case, "*" is used as the wildcard to search across all fields in the index.
By using the Query String Query, you can perform flexible searches by combining terms, phrases, and operators to express your search criteria.
Here are the 4 sample results you provided:
Document 1:
_index: tmp_car_detail
_id: CJuEaIkBTFMFHfJZjNPR
_score: 10.458993
Document 2:
_index: tmp_car_detail
_id: CZuEaIkBTFMFHfJZjNPW
_score: 10.458993
Document 3:
_index: tmp_car_detail
_id: <ID>
_score: <Score>
Document 4:
_index: tmp_car_detail
_id: <ID>
_score: <Score>
As the _score is the same for Documents 1 and 2, both are considered equally relevant. Elasticsearch uses internal algorithms to calculate the relevance score based on the matching terms, their frequency, and other factors. The specific details of how the relevance score is calculated are complex and depend on the scoring algorithm and configuration.
If you want to fine-tune the relevance of your search results, you can experiment with the following:
Boosting: You can assign higher weights (boost) to specific fields or terms to make them more important in the relevance calculation. For example, you can boost the "city" or "transmission" field to give them more relevance.
Similarity Models: Elasticsearch provides different similarity models that can influence the scoring. You can experiment with different similarity models to see which one produces more relevant results for your use case.
Relevance Feedback: You can use techniques like relevance feedback to refine search results based on user feedback. This involves analyzing user interactions with search results and using that feedback to improve future search results.
Geo Point:
In mysql DB we have a table tbl_zipcodes that we can use for geoLocation query in elasticsearch.
Table format in MYSQLDB
[test_au2.database]> describe tbl_zipcodes; +---------+--------------------------+------+-----+---------+----------------+ | Field | Type | Null | Key | Default | Extra | +---------+--------------------------+------+-----+---------+----------------+ | id | int(11) | NO | PRI | NULL | auto_increment |
| zipcode | int(5) unsigned zerofill | YES | | NULL | |
| name | varchar(500) | NO | | NULL | |
| lat | double | NO | | NULL | |
| lon | double | NO | | NULL | | +---------+--------------------------+------+-----+---------+----------------+ 5 rows in set (0.00 sec)
To index the tbl_zipcodes table from your MySQL database into Elasticsearch with geolocation (latitude and longitude), you can use the following Python script:
Mapping and indexing
Script Name: index_mysql_data_with_geo.py
—--------------------------------------------------------------------------------------------------------------
from elasticsearch import Elasticsearch
from elasticsearch.helpers import bulk
import pymysql
# Connect to your MySQL database
db = pymysql.connect(
host="localhost",
user="test_au2.database",
password="t1_0Ng27i",
database="test_au2.database"
)
cursor = db.cursor()
# Fetch data from tbl_zipcodes
def fetch_data():
query = "SELECT id, zipcode, name, lat, lon FROM tbl_zipcodes"
cursor.execute(query)
columns = [column[0] for column in cursor.description]
return [dict(zip(columns, row)) for row in cursor.fetchall()]
# Create Elasticsearch index
def create_index(es, index_name):
settings = {
"settings": {
"number_of_shards": 1,
"number_of_replicas": 0
},
"mappings": {
"properties": {
"zipcode": {"type": "integer"},
"name": {"type": "text"},
"location": {
"type": "geo_point"
}
}
}
}
es.indices.create(index=index_name, body=settings)
# Index the data into Elasticsearch with geolocation
def index_data(es, index_name, data):
actions = [
{
"_index": index_name,
"_id": doc["id"],
"_source": {
"zipcode": doc["zipcode"],
"name": doc["name"],
"location": {
"lat": doc["lat"],
"lon": doc["lon"]
}
}
}
for doc in data
]
bulk(es, actions)
if __name__ == "__main__":
# Connect to Elasticsearch
es = Elasticsearch(['http://localhost:9200'])
index_name = "zipcodes_index"
# Fetch data from MySQL
data = fetch_data()
# Check if the index already exists
if not es.indices.exists(index=index_name):
create_index(es, index_name)
# Index the data
index_data(es, index_name, data)
—---------------------------------------------------------------------------------------------------------------
This script will create an Elasticsearch index named zipcodes_index and index the data from the tbl_zipcodes table with the appropriate mapping for geolocation. The lat and lon fields from the table will be indexed as a geo_point type in Elasticsearch, allowing you to perform geospatial queries based on latitude and longitude.
Queries:
1. Geo Distance Query
2. Geo Bounding Box Query
3. Geo Polygon Query
4. Geo Shape Query
1. Geo Distance Query for Berlin
Search for locations within a specific distance (e.g., 20 km) from Berlin (latitude 52.5200, longitude 13.4050):
GET zipcodes_index/_search
{
"query": {
"geo_distance": {
"distance": "20km",
"location": {
"lat": 52.5200,
"lon": 13.4050
}
}
}
}
202 Record found

2. Geo Bounding Box Query for Berlin
In this example, the query is searching for documents within the geographic bounding box with top-left coordinates (52.55, 13.35) and bottom-right coordinates (52.48, 13.46).
GET zipcodes_index/_search
{
"query": {
"geo_bounding_box": {
"location": {
"top_left": {
"lat": 52.55,
"lon": 13.35
},
"bottom_right": {
"lat": 52.48,
"lon": 13.46
}
}
}
}
}
78 record found

3. Geo Polygon Query for Berlin
Search for locations within a specific polygon around Berlin:
GET zipcodes_index/_search
{
"query": {
"geo_polygon": {
"location": {
"points": [
{ "lat": 52.53, "lon": 13.39 },
{ "lat": 52.50, "lon": 13.41 },
{ "lat": 52.49, "lon": 13.35 },
{ "lat": 52.53, "lon": 13.33 }
]
}
}
}
}
The given Elasticsearch query is searching for documents within the "zipcodes_index" index that fall within a specified geographic polygon. The polygon is defined by a set of four coordinate points, each consisting of latitude ("lat") and longitude ("lon") values.
The coordinate points for the polygon are as follows:
{ "lat": 53.0, "lon": 13.0 }
{ "lat": 52.0, "lon": 13.0 }
{ "lat": 52.0, "lon": 14.0 }
{ "lat": 53.0, "lon": 14.0 }

4. Geo Shape Query for Berlin
Search for locations within a predefined geo shape (circle) around Berlin:
GET zipcodes_index/_search
{
"query": {
"geo_shape": {
"location": {
"shape": {
"type": "circle",
"radius": "15km",
"coordinates": [13.4050, 52.5200]
},
"relation": "within"
}
}
}
}
192 record found

Please remember to replace the latitude and longitude coordinates in the queries with the actual coordinates for the city of Berlin. These queries will help you find locations within specified distances or shapes around Berlin in the Elasticsearch index.
Step 1: Configure Elasticsearch
vi /etc/elasticsearch/elasticsearch.yml
xpack.security.enabled: true
elastic is main user that is admin
pass- PXXktEs9!
restart elasticsearch
vi /etc/kibana/kibana.yml
elasticsearch.hosts: ["http://localhost:9200"]
elasticsearch.username: "kibana_system"
elasticsearch.password: "test@123"
restart kibana
cmd to add a user in ES
curl -u elastic -X POST "http://localhost:9200/_security/user/abhikumar" -H 'Content-Type: application/json' -d '{
"password": "PXXktEs9!",
"roles": ["superuser"]
}'
cmd to reset password on ES
curl -u abhikumar -X PUT "http://localhost:9200/_security/user/elastic/_password" -H 'Content-Type: application/json' -d '{
"password": "PXXktEs9!"
}'
cmd to delete password on ES
curl -u elastic -X DELETE "http://localhost:9200/_security/user/manjeet"
How to enable apikey auth in elasticsearch
vi /etc/elasticsearch/elasticsearch.yml
xpack.security.authc.api_key.enabled: true
restart elasticsearch service
create api key with a role_descriptor
in below example we using superuser role
GET /_security/api_key
GET /_security/role/superuser
POST /_security/api_key
{
"name": "all-api-call"
, "expiration": "1d"
, "role_descriptors": {
"superuser" : {
"cluster" : [
"all"
],
"indices" : [
{
"names" : [
"*"
],
"privileges" : [
"all"
],
"allow_restricted_indices" : false
}
],
"applications" : [
{
"application" : "*",
"privileges" : [
"*"
],
"resources" : [
"*"
]
}
],
"run_as" : [
"*"
],
"metadata" : {
"_reserved" : true
},
"transient_metadata" : { }
}
}
}
{
"id" : "vD9mnIkBQ-PDyNAeSTnU",
"name" : "all-api-call",
"expiration" : 1690632496578,
"api_key" : "rSL8n89lQzKw6ryVyjrqOg",
"encoded" : "dkQ5bW5Ja0JRLVBEeU5BZVNUblU6clNMOG44OWxRekt3NnJ5VnlqcnFPZw=="
}
vD9mnIkBQ-PDyNAeSTnU:rSL8n89lQzKw6ryVyjrqOg
give me a curl cmd with below Autherization apikey
dkQ5bW5Ja0JRLVBEeU5BZVNUblU6clNMOG44OWxRekt3NnJ5VnlqcnFPZw==
curl -X GET "http://elk.shiiky.com:9200/_cluster/health" -H "Authorization: ApiKey dkQ5bW5Ja0JRLVBEeU5BZVNUblU6clNMOG44OWxRekt3NnJ5VnlqcnFPZw=="
----------
Install a logstash service.
logstash binary location
/usr/share/logstash/bin/logstash
create conf file in logstash
/usr/share/logstash/config/test.conf
general formate of conf file as below:
input {
jdbc {
jdbc_driver_library => "/usr/share/java/mysql-connector-java-8.0.27/mysql-connector-java-8.0.27.jar"
jdbc_driver_class => "com.mysql.cj.jdbc.Driver"
jdbc_connection_string => "jdbc:mysql://localhost:3306/test_au2.database?zeroDateTimeBehavior=convertToNull"
jdbc_user => "test_au2.database"
jdbc_password => "Xd_x532x9"
statement => "SELECT *, UNIX_TIMESTAMP(modification_time) AS unix_ts_in_secs, CASE WHEN deleted_flag = 1 THEN true ELSE false END AS deleted_in_mysql FROM es_table WHERE (UNIX_TIMESTAMP(modification_time) > :sql_last_value AND modification_time < NOW()) ORDER BY modification_time ASC"
use_column_value => true
tracking_column => "unix_ts_in_secs"
tracking_column_type => "numeric"
schedule => "*/5 * * * * *"
jdbc_paging_enabled => true
}
}
filter {
mutate {
copy => { "id" => "[@metadata][_id]"}
remove_field => ["id", "@version", "unix_ts_in_secs"]
}
# Add a 'ruby' filter to set the 'action' field conditionally
ruby {
code => '
if event.get("deleted_in_mysql") == true
event.set("action", "delete")
else
event.set("action", "index")
end
'
}
}
output {
elasticsearch {
hosts => ["http://localhost:9200"]
user => "elastic"
password => "PXXktEs9!"
index => "rdbms_sync_idx"
document_id => "%{[@metadata][_id]}"
action => "%{action}"
}
}
what we did for index update and delete of tmp_tbl_cars data in mysql to sync it to ES.
we created mysql table compatible, - we added 3 column in table - modification_time, insertion_time and as is_deleted column
then we created conf file
/usr/share/logstash/config/synchronization.conf
and tested like by running this
ExecStart=
once its update insertion working fine.
then created service for this eslogstash.service.
and for delete created one python file so is_deleted status true document will delete by this python script every minute.
/root/elasticsearch_indexing_development/index_to_elastic/synchronized_delete_document.py
Elastic APM
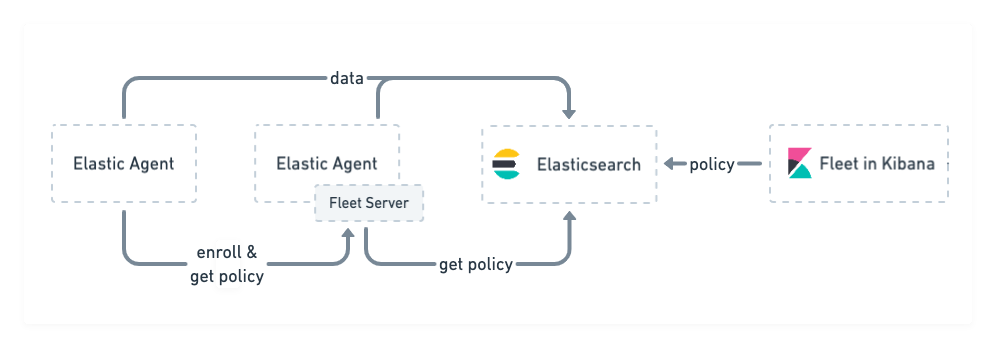
Fleet Server- It used to centrally manage Elastic Agents. It’s launched as part of an Elastic Agent on a host intended to act as a server. One Fleet Server process can support many Elastic Agent connections, and serves as a control plane for updating agent policies, collecting status information, and coordinating actions across Elastic Agents.
https://www.elastic.co/guide/en/fleet/7.17/fleet-server.html
APM server
The APM Server in Elasticsearch stands for Application Performance Monitoring Server. It is a component of the Elastic Stack designed to collect and process data from various sources related to application performance monitoring. APM Server sits between your application and Elasticsearch, facilitating the collection, aggregation, and forwarding of performance metrics, traces, and other monitoring data to Elasticsearch.
APM server should be on a server where application running.
install apm server - download APM server package
in pacakge we have apm-server.yaml file
in this file we configure some info.

Steps
Install app.
Go to APM
Download APM server package

Install APM agents
need to copy code and put it your application code
Run APM by cmd and check on UI under APM - Services
go to apm-server cmd
./apm-server -

No comments:
Post a Comment